> ## Documentation Index
> Fetch the complete documentation index at: https://docs.insecureweb.com/llms.txt
> Use this file to discover all available pages before exploring further.

# Integration guide for AWS Cloudwatch

> AWS Cloudwatch enables auditing, security monitoring, and operational troubleshooting by tracking user activity and API usage. CloudTrail logs, continuously monitors, and retains account activity related to actions across your AWS infrastructure, giving you control over storage, analysis, and remediation actions.

#### 1. Go to IAM configuration panel and click on "Users"
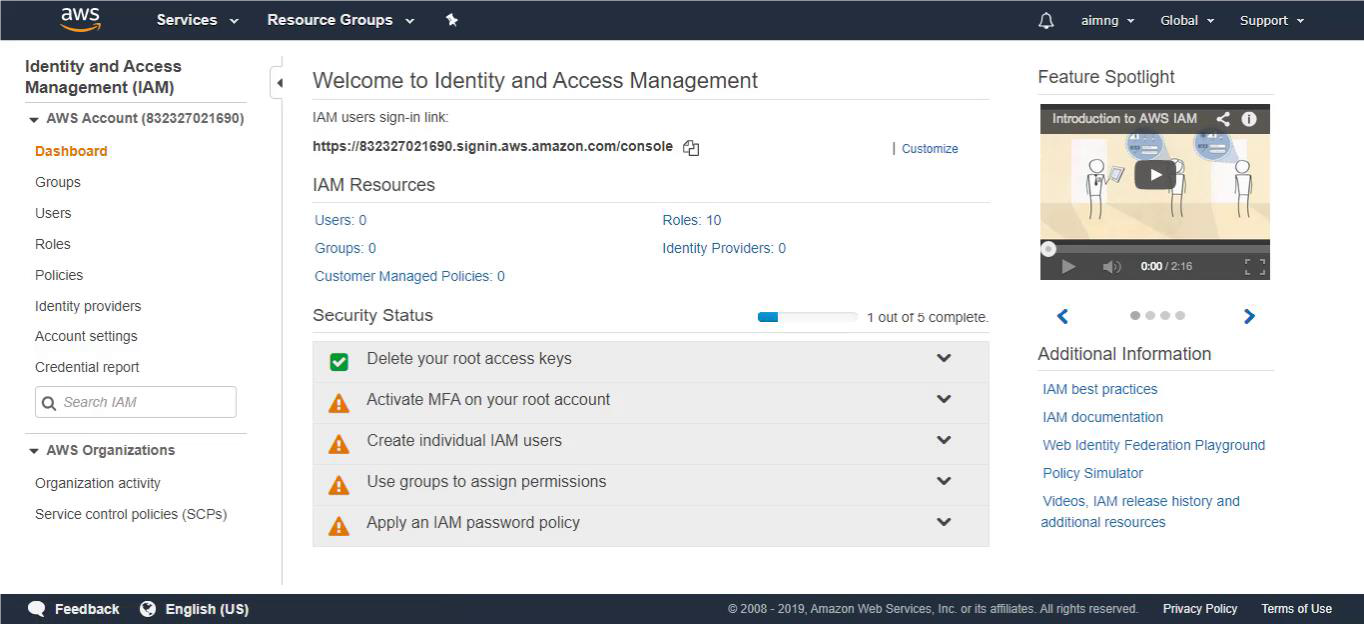
<img height="200" className="block rounded-xl" src="https://mintcdn.com/insecurewebllc/QbitNOzp3ljcQlGB/images/integrations/aws/iam_config.png?fit=max&auto=format&n=QbitNOzp3ljcQlGB&q=85&s=2e23d01356b04dd5b8df725fa74405b8" alt="AWS" data-path="images/integrations/aws/iam_config.png" />

#### 2. Add a new user filling the name and marking the access type "Programmatic access". Then click on Next.
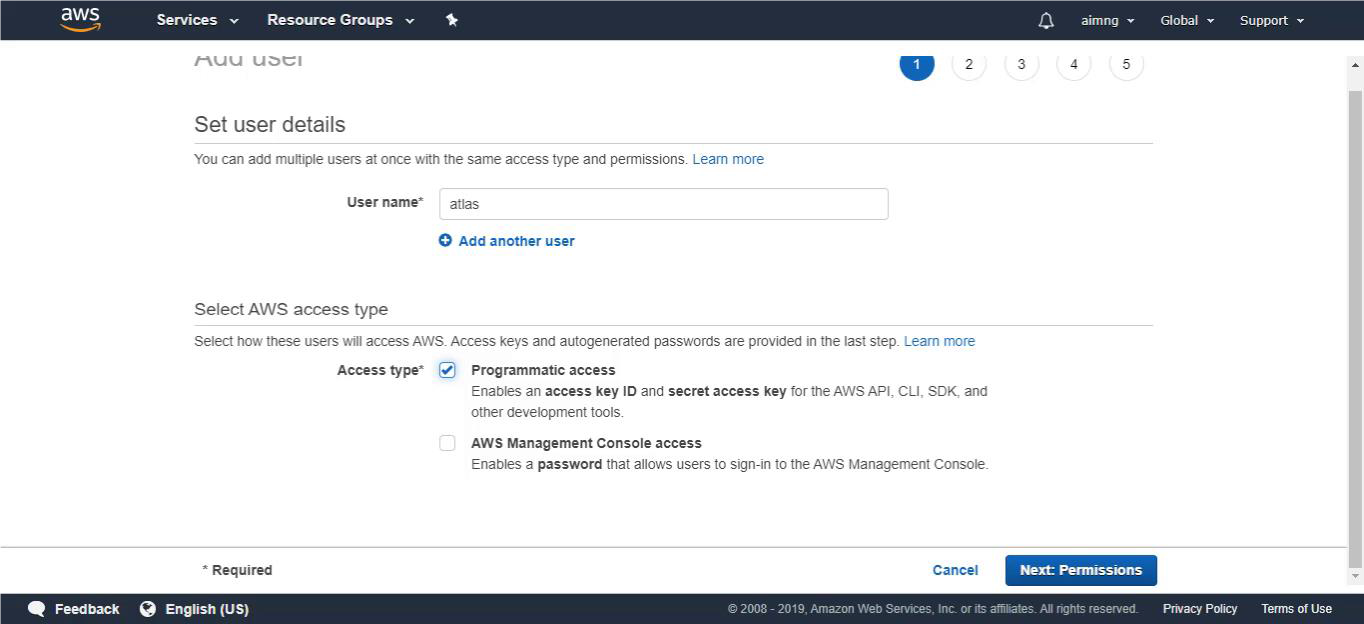
<img height="200" className="block rounded-xl" src="https://mintcdn.com/insecurewebllc/QbitNOzp3ljcQlGB/images/integrations/aws/programmatic_access.png?fit=max&auto=format&n=QbitNOzp3ljcQlGB&q=85&s=b094ad08bb798629338e872054a662de" alt="AWS" data-path="images/integrations/aws/programmatic_access.png" />

#### 3. Click on Attach existing policies directly. Find CloudWatchReadOnlyAccess and mark it. Then click on next.
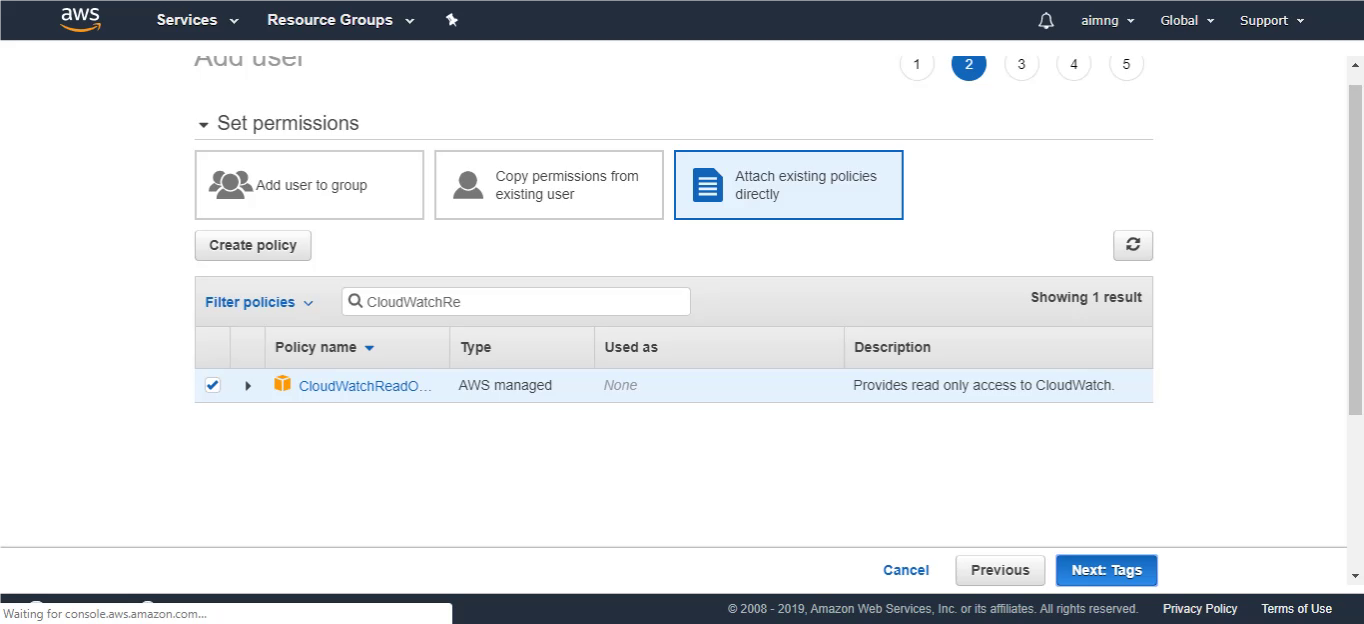
<img height="200" className="block rounded-xl" src="https://mintcdn.com/insecurewebllc/QbitNOzp3ljcQlGB/images/integrations/aws/policies_directly.png?fit=max&auto=format&n=QbitNOzp3ljcQlGB&q=85&s=fa8480f142d75e553d48af47bbf426df" alt="AWS" data-path="images/integrations/aws/policies_directly.png" />

#### 4. In the tags page click on next.
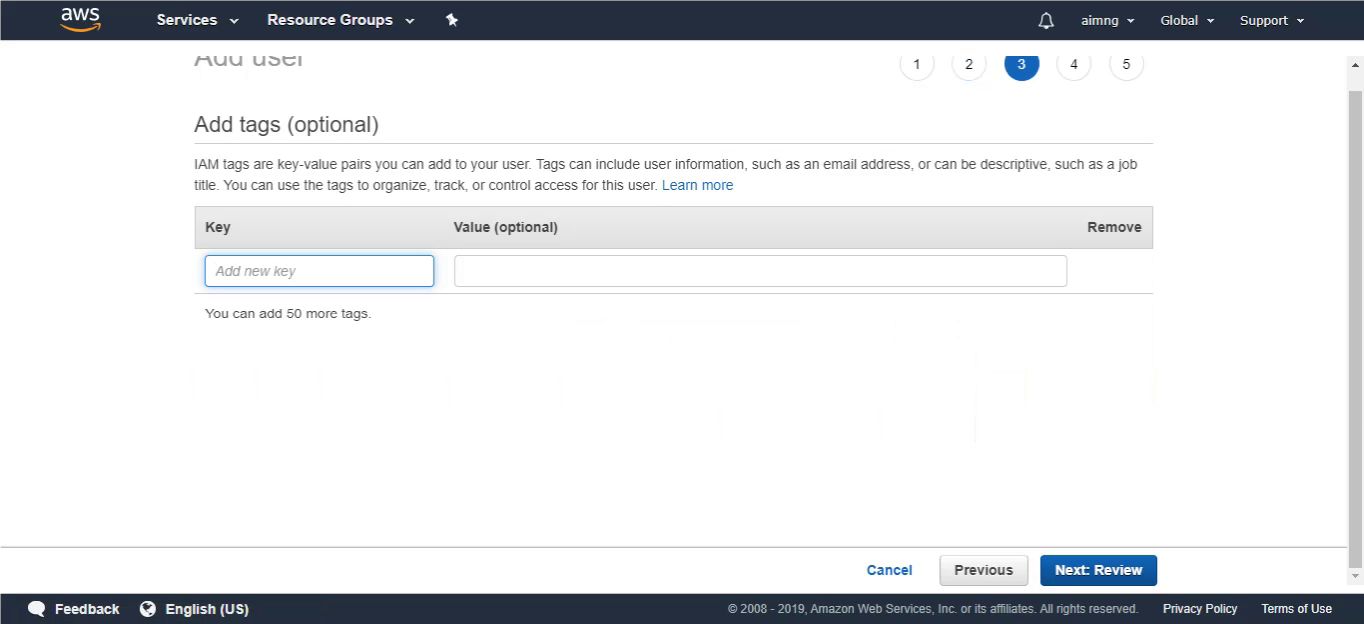
<img height="200" className="block rounded-xl" src="https://mintcdn.com/insecurewebllc/QbitNOzp3ljcQlGB/images/integrations/aws/tags.png?fit=max&auto=format&n=QbitNOzp3ljcQlGB&q=85&s=cbfcd463c9c86318f7889944faaab8ca" alt="AWS" data-path="images/integrations/aws/tags.png" />

#### 5. Create user and then download the csv file with the access and secret keys.
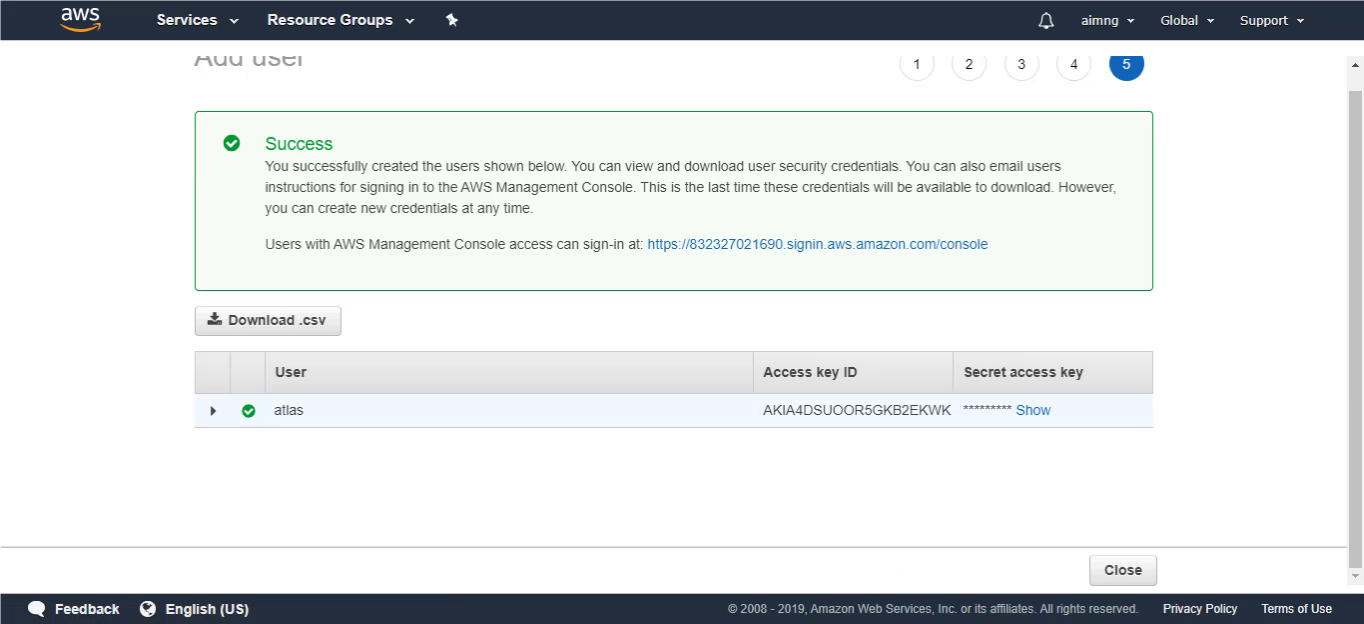
<img height="200" className="block rounded-xl" src="https://mintcdn.com/insecurewebllc/QbitNOzp3ljcQlGB/images/integrations/aws/user_secret.png?fit=max&auto=format&n=QbitNOzp3ljcQlGB&q=85&s=f43eabc502acf9ad0cd0fd0336711430" alt="AWS" data-path="images/integrations/aws/user_secret.png" />

#### 6. Fill the following inputs with the info obtained in previous steps.
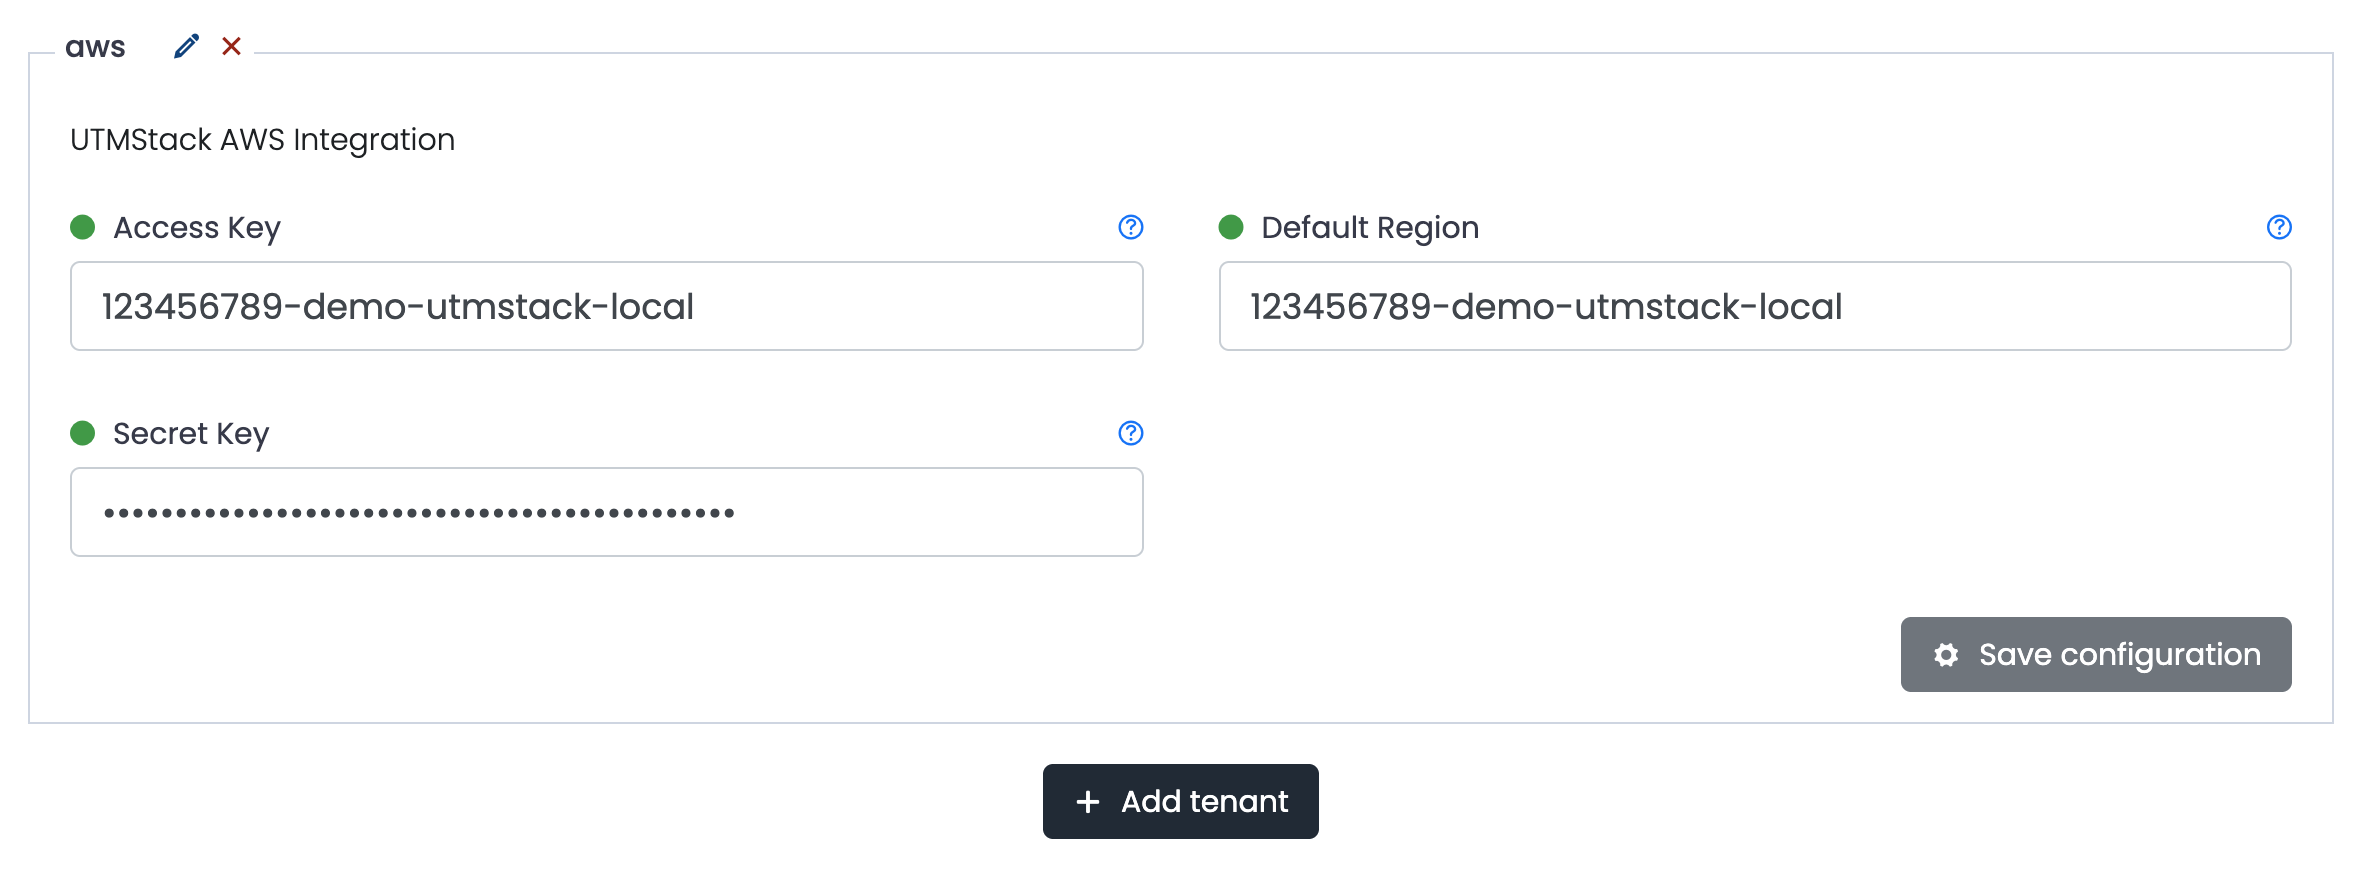
<img height="200" className="block rounded-xl" src="https://mintcdn.com/insecurewebllc/QbitNOzp3ljcQlGB/images/integrations/aws/step6.png?fit=max&auto=format&n=QbitNOzp3ljcQlGB&q=85&s=5ebe8ba36d0bcfad845a90e0862a825e" alt="AWS" data-path="images/integrations/aws/step6.png" />

## Configuring AWS Cloudwatch

#### 7. In the CloudTrail panel, select “Create trail”.
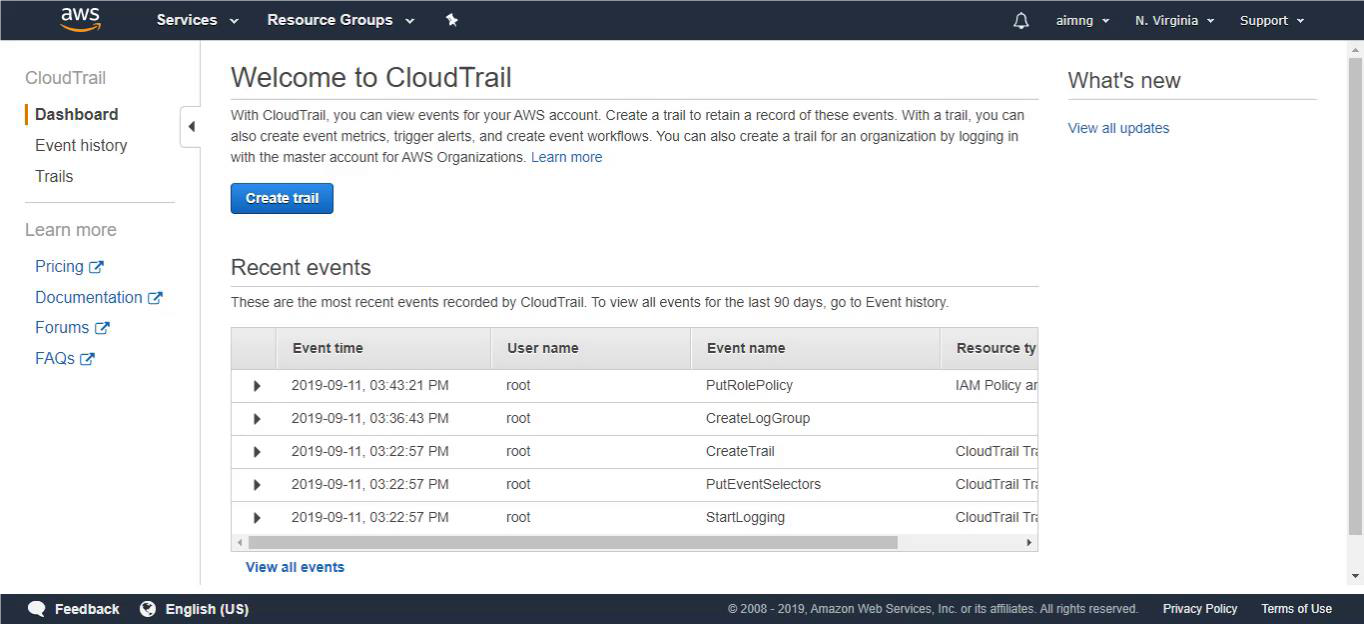
<img height="200" className="block rounded-xl" src="https://mintcdn.com/insecurewebllc/QbitNOzp3ljcQlGB/images/integrations/aws/welcome-page.png?fit=max&auto=format&n=QbitNOzp3ljcQlGB&q=85&s=cff6c3b886294609d853fa08b3ea9576" alt="AWS" data-path="images/integrations/aws/welcome-page.png" />

#### 8. Fill in the "Trail name" field.
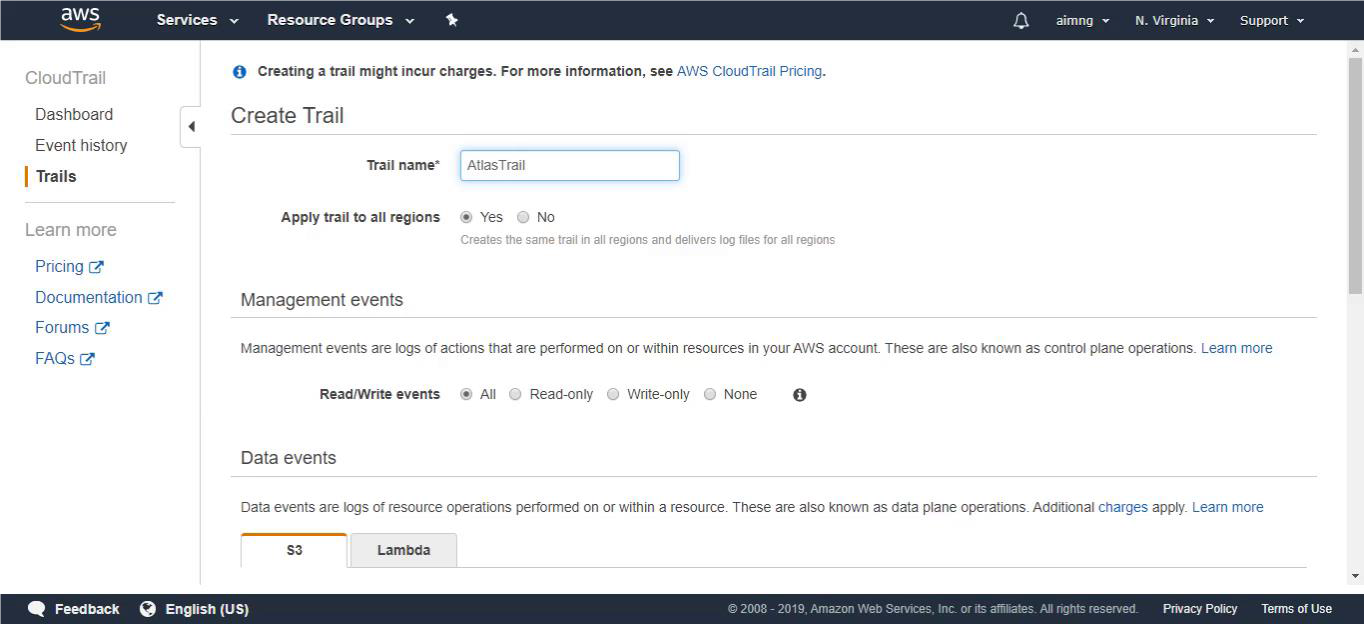
<img height="200" className="block rounded-xl" src="https://mintcdn.com/insecurewebllc/QbitNOzp3ljcQlGB/images/integrations/aws/trail-name.png?fit=max&auto=format&n=QbitNOzp3ljcQlGB&q=85&s=bfea8b986202828c53538cd8c239f165" alt="AWS" data-path="images/integrations/aws/trail-name.png" />

#### 9. Mark "Select all S3 buckets in your account".
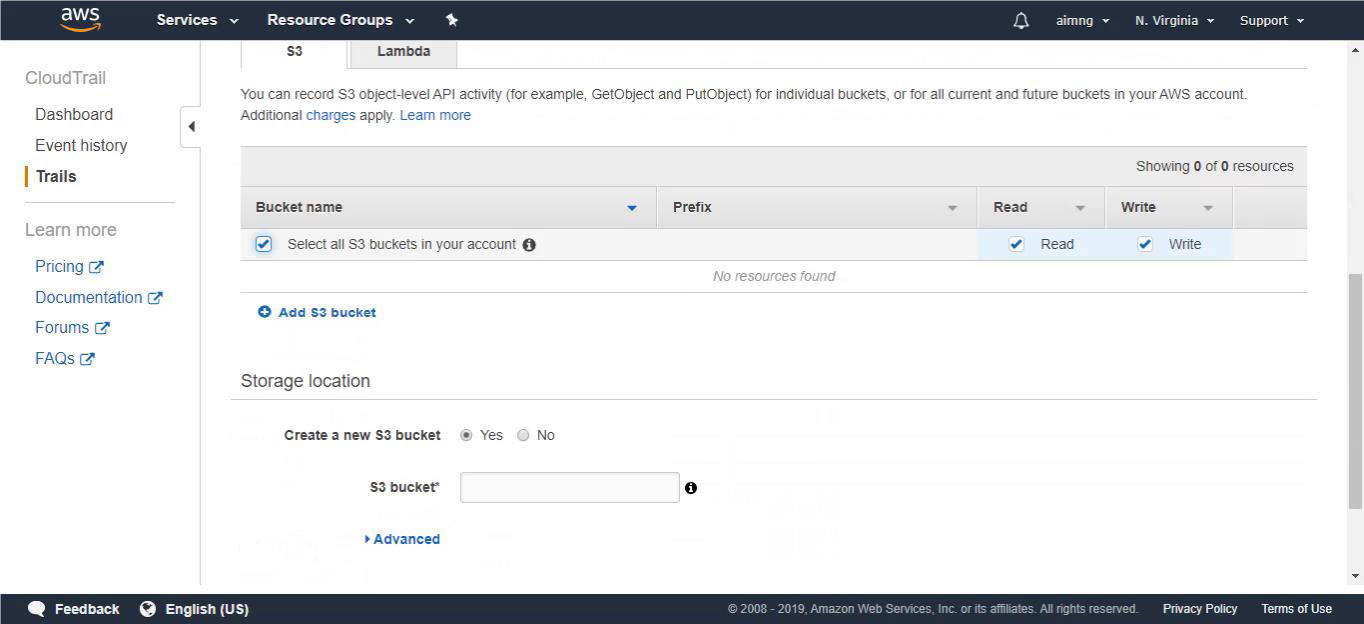
<img height="200" className="block rounded-xl" src="https://mintcdn.com/insecurewebllc/QbitNOzp3ljcQlGB/images/integrations/aws/s3-buckets.png?fit=max&auto=format&n=QbitNOzp3ljcQlGB&q=85&s=08ac36bb8f9d6c200b0d8797cdcf2b14" alt="AWS" data-path="images/integrations/aws/s3-buckets.png" />

#### 10. Fill in the "S3 bucket" field. The name of the bucket must be unique in S3. Then click on “Create”.
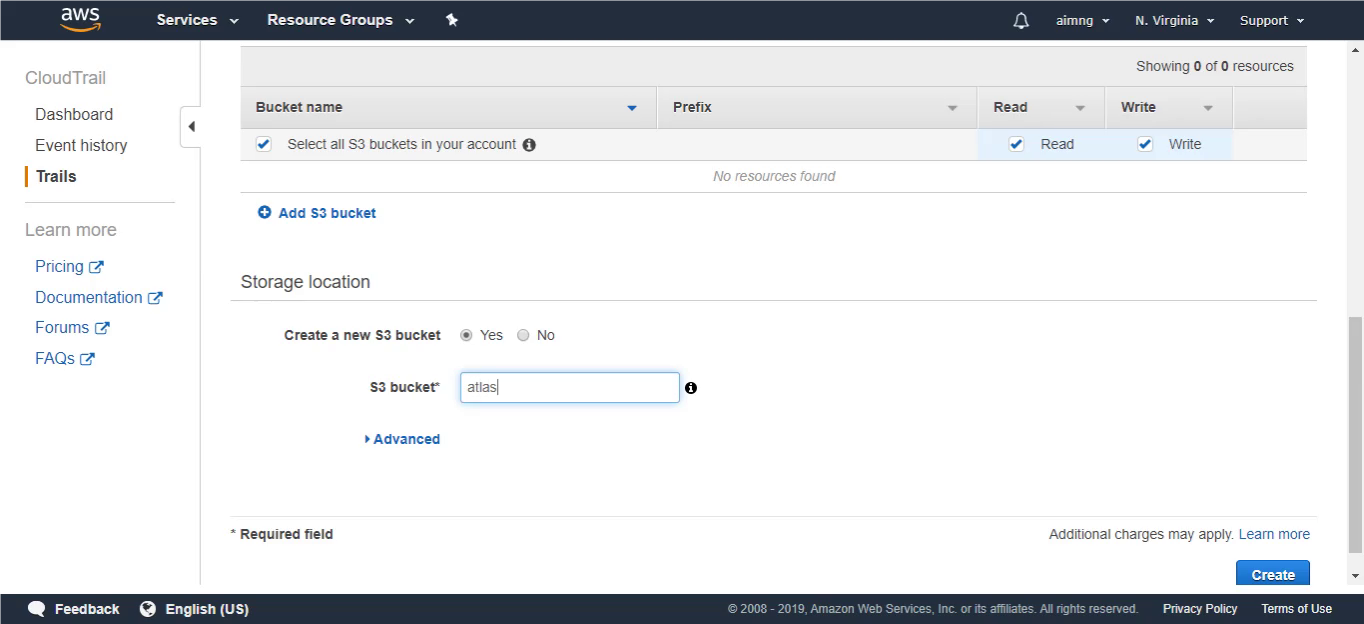
<img height="200" className="block rounded-xl" src="https://mintcdn.com/insecurewebllc/QbitNOzp3ljcQlGB/images/integrations/aws/bucket-name.png?fit=max&auto=format&n=QbitNOzp3ljcQlGB&q=85&s=f7fee002178e78d65e0506a57f99293d" alt="AWS" data-path="images/integrations/aws/bucket-name.png" />

#### 11. Click on the name of the trail to edit.
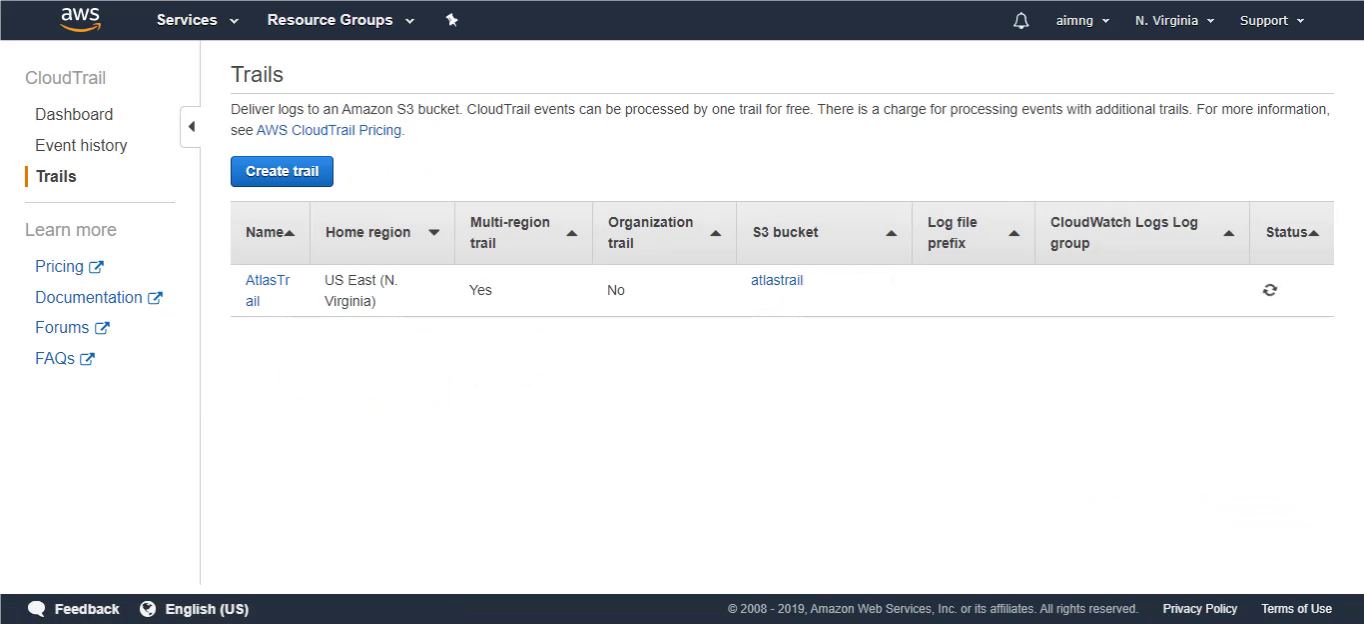
<img height="200" className="block rounded-xl" src="https://mintcdn.com/insecurewebllc/QbitNOzp3ljcQlGB/images/integrations/aws/edit-trail.png?fit=max&auto=format&n=QbitNOzp3ljcQlGB&q=85&s=cb5bfd6ed0165c0fa5f78543c806c4a5" alt="AWS" data-path="images/integrations/aws/edit-trail.png" />

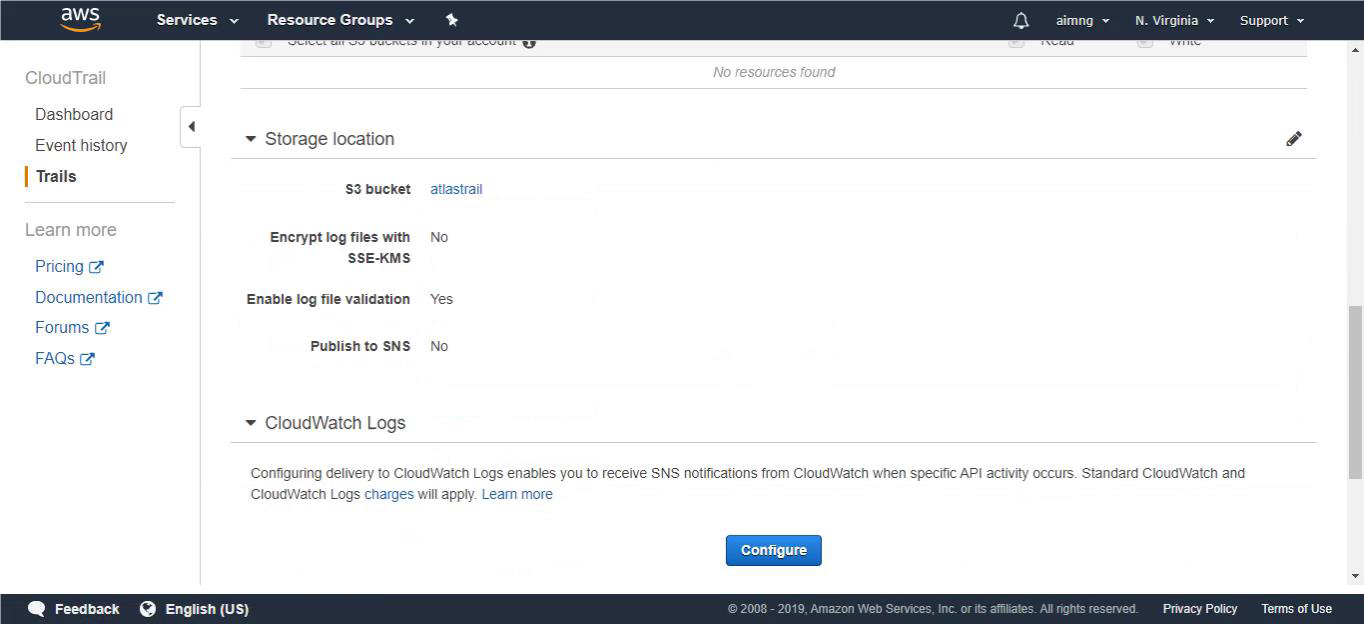
#### 12. Configure CloudWatch Logs.

<img height="200" className="block rounded-xl" src="https://mintcdn.com/insecurewebllc/QbitNOzp3ljcQlGB/images/integrations/aws/cloud-watch-config.png?fit=max&auto=format&n=QbitNOzp3ljcQlGB&q=85&s=dd3b1e75e023e0a0173a438b2beb3f7d" alt="AWS" data-path="images/integrations/aws/cloud-watch-config.png" />

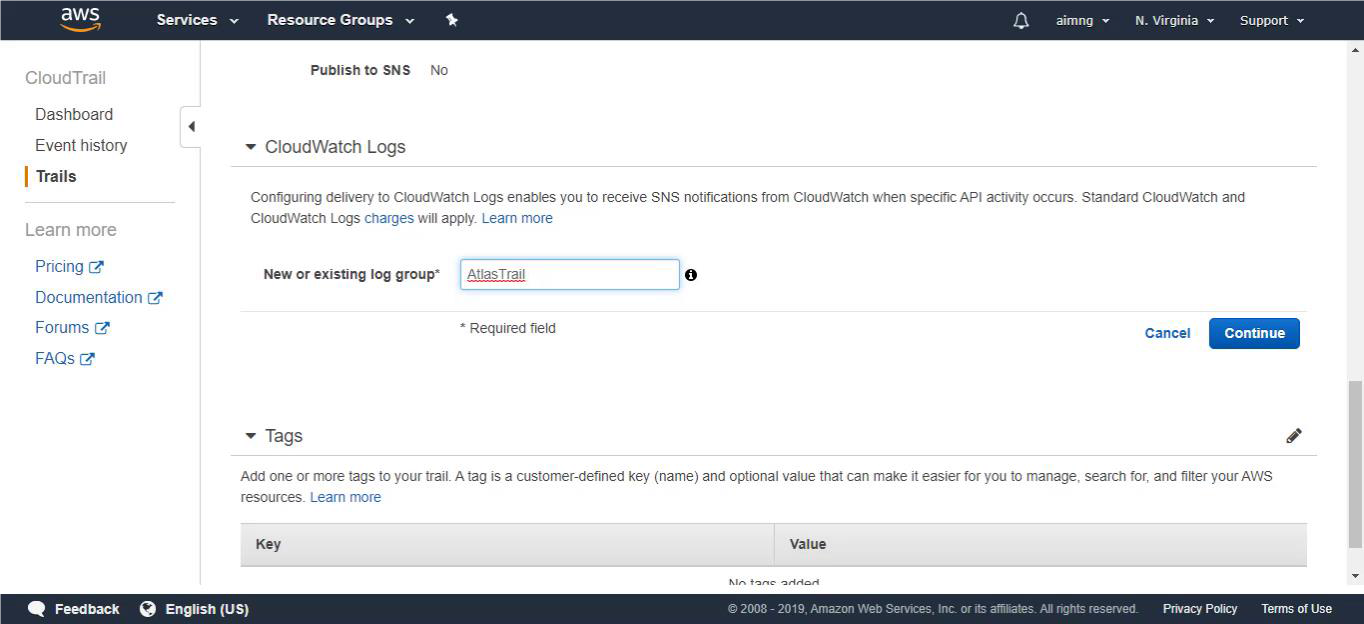
#### 13. Fill the group name and continue.
<img height="200" className="block rounded-xl" src="https://mintcdn.com/insecurewebllc/QbitNOzp3ljcQlGB/images/integrations/aws/trial-group.png?fit=max&auto=format&n=QbitNOzp3ljcQlGB&q=85&s=7403dea0d8f44dd48ff1f670812f78b1" alt="AWS" data-path="images/integrations/aws/trial-group.png" />

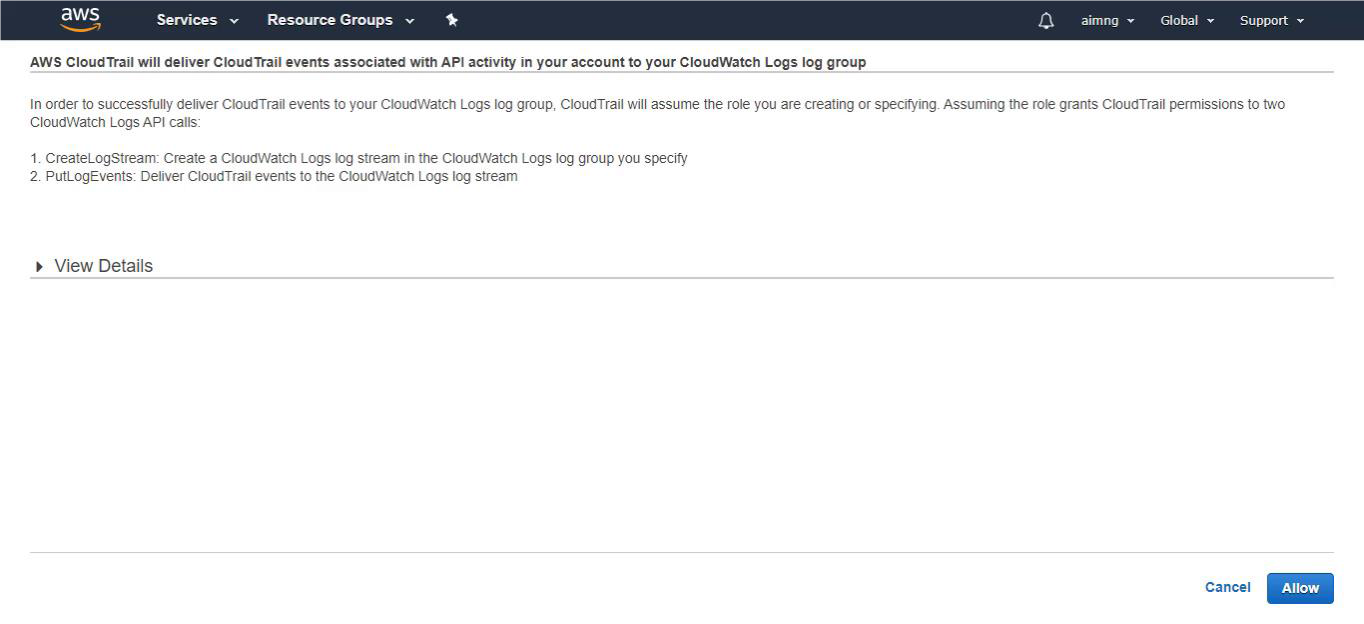
#### 14. Click on “Allow” to grant CloudTrail permissions.
<img height="200" className="block rounded-xl" src="https://mintcdn.com/insecurewebllc/QbitNOzp3ljcQlGB/images/integrations/aws/trial-permissions.png?fit=max&auto=format&n=QbitNOzp3ljcQlGB&q=85&s=f6427a72c7301e6c210af7fea16469ab" alt="AWS" data-path="images/integrations/aws/trial-permissions.png" />

#### 15. Click on the button shown below, to activate the UTMStack features related to this integration