> ## Documentation Index
> Fetch the complete documentation index at: https://docs.insecureweb.com/llms.txt
> Use this file to discover all available pages before exploring further.
# API Keys Management
> Create and manage API keys for secure programmatic access to UTMStack
API Keys provide secure programmatic access to UTMStack's API endpoints. This guide walks you through creating, managing, and using API keys for authentication.
API Keys are an alternative authentication method to user credentials, ideal for integrations, automation scripts, and third-party applications.
***
## Accessing API Keys Management
From the UTMStack main interface, click on the **Settings** menu in the left sidebar.
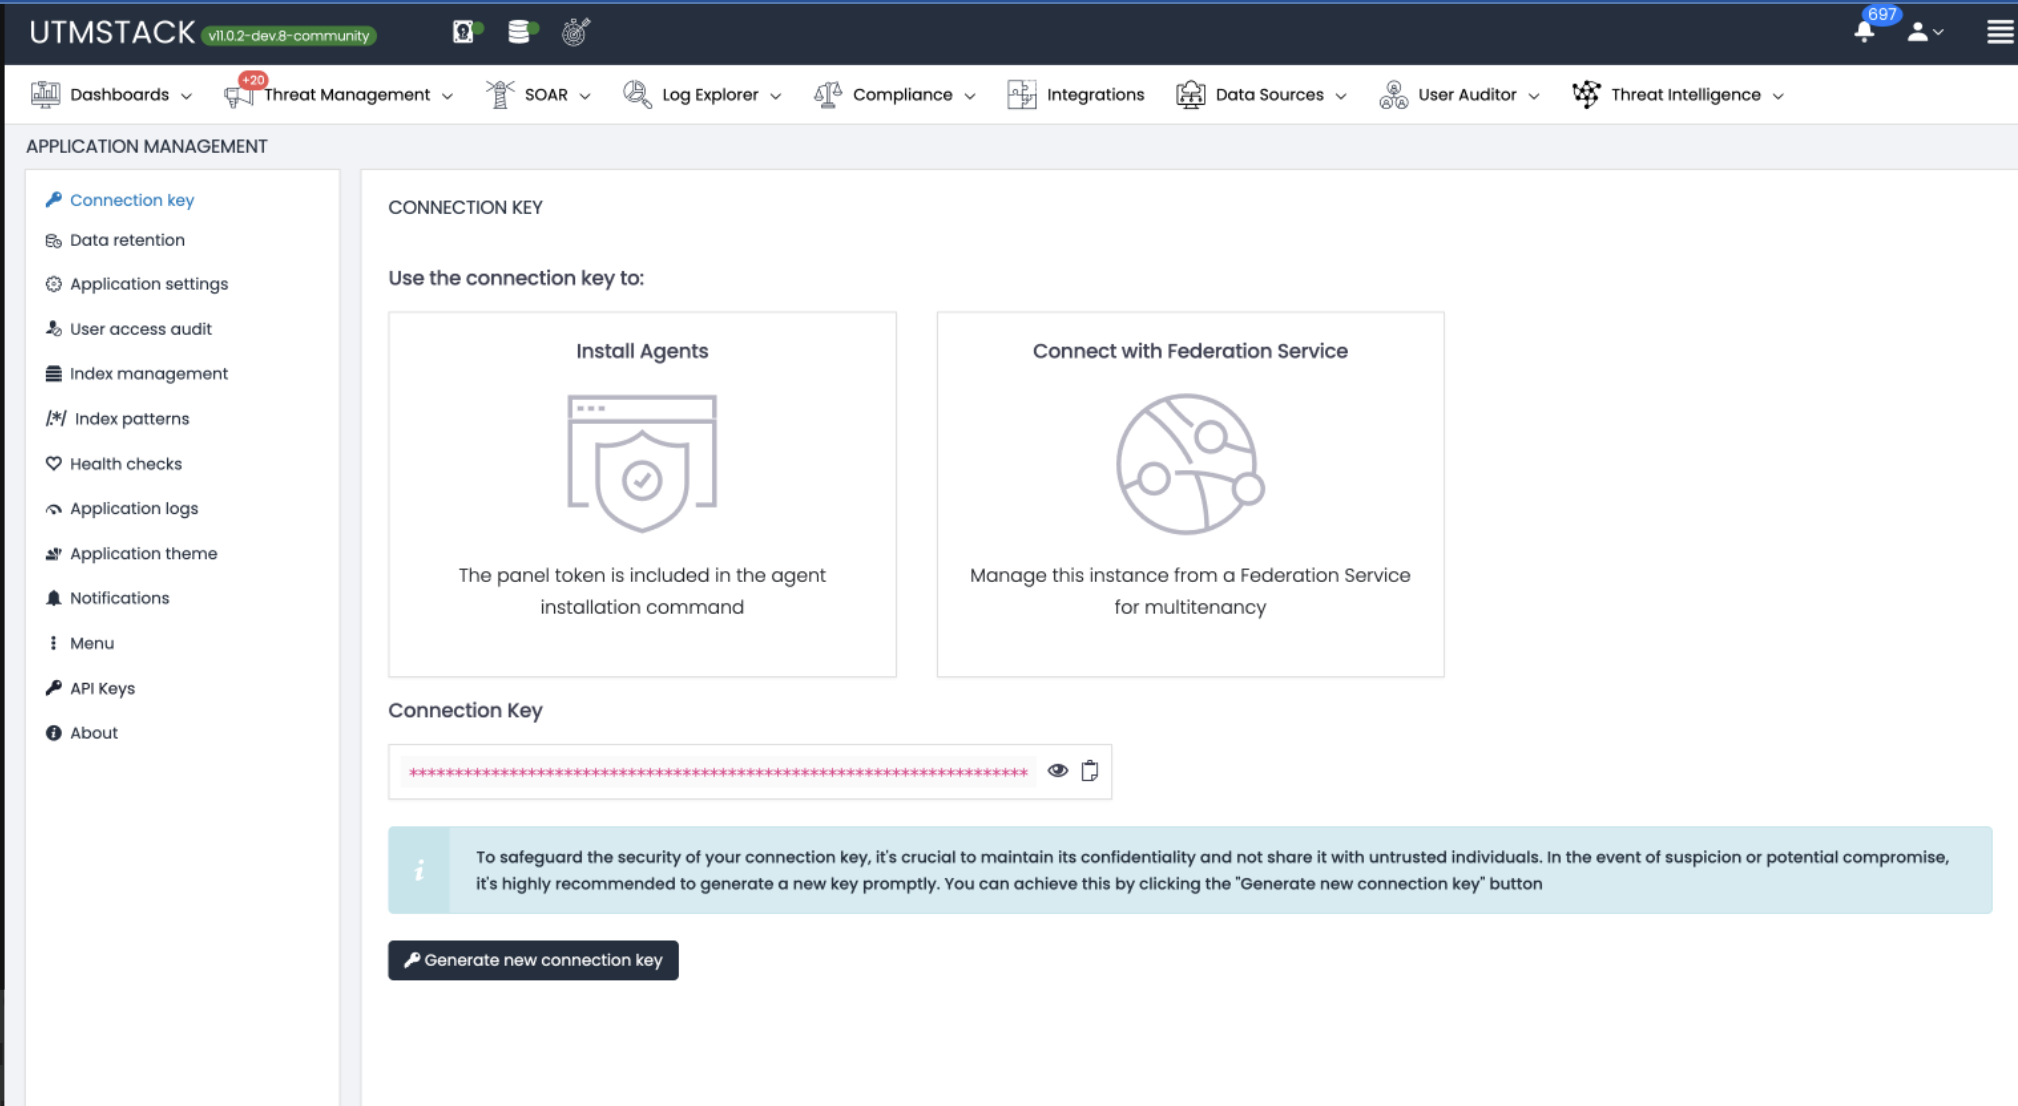 Select **Connection Keys** from the settings menu to access the Connection Keys management page.
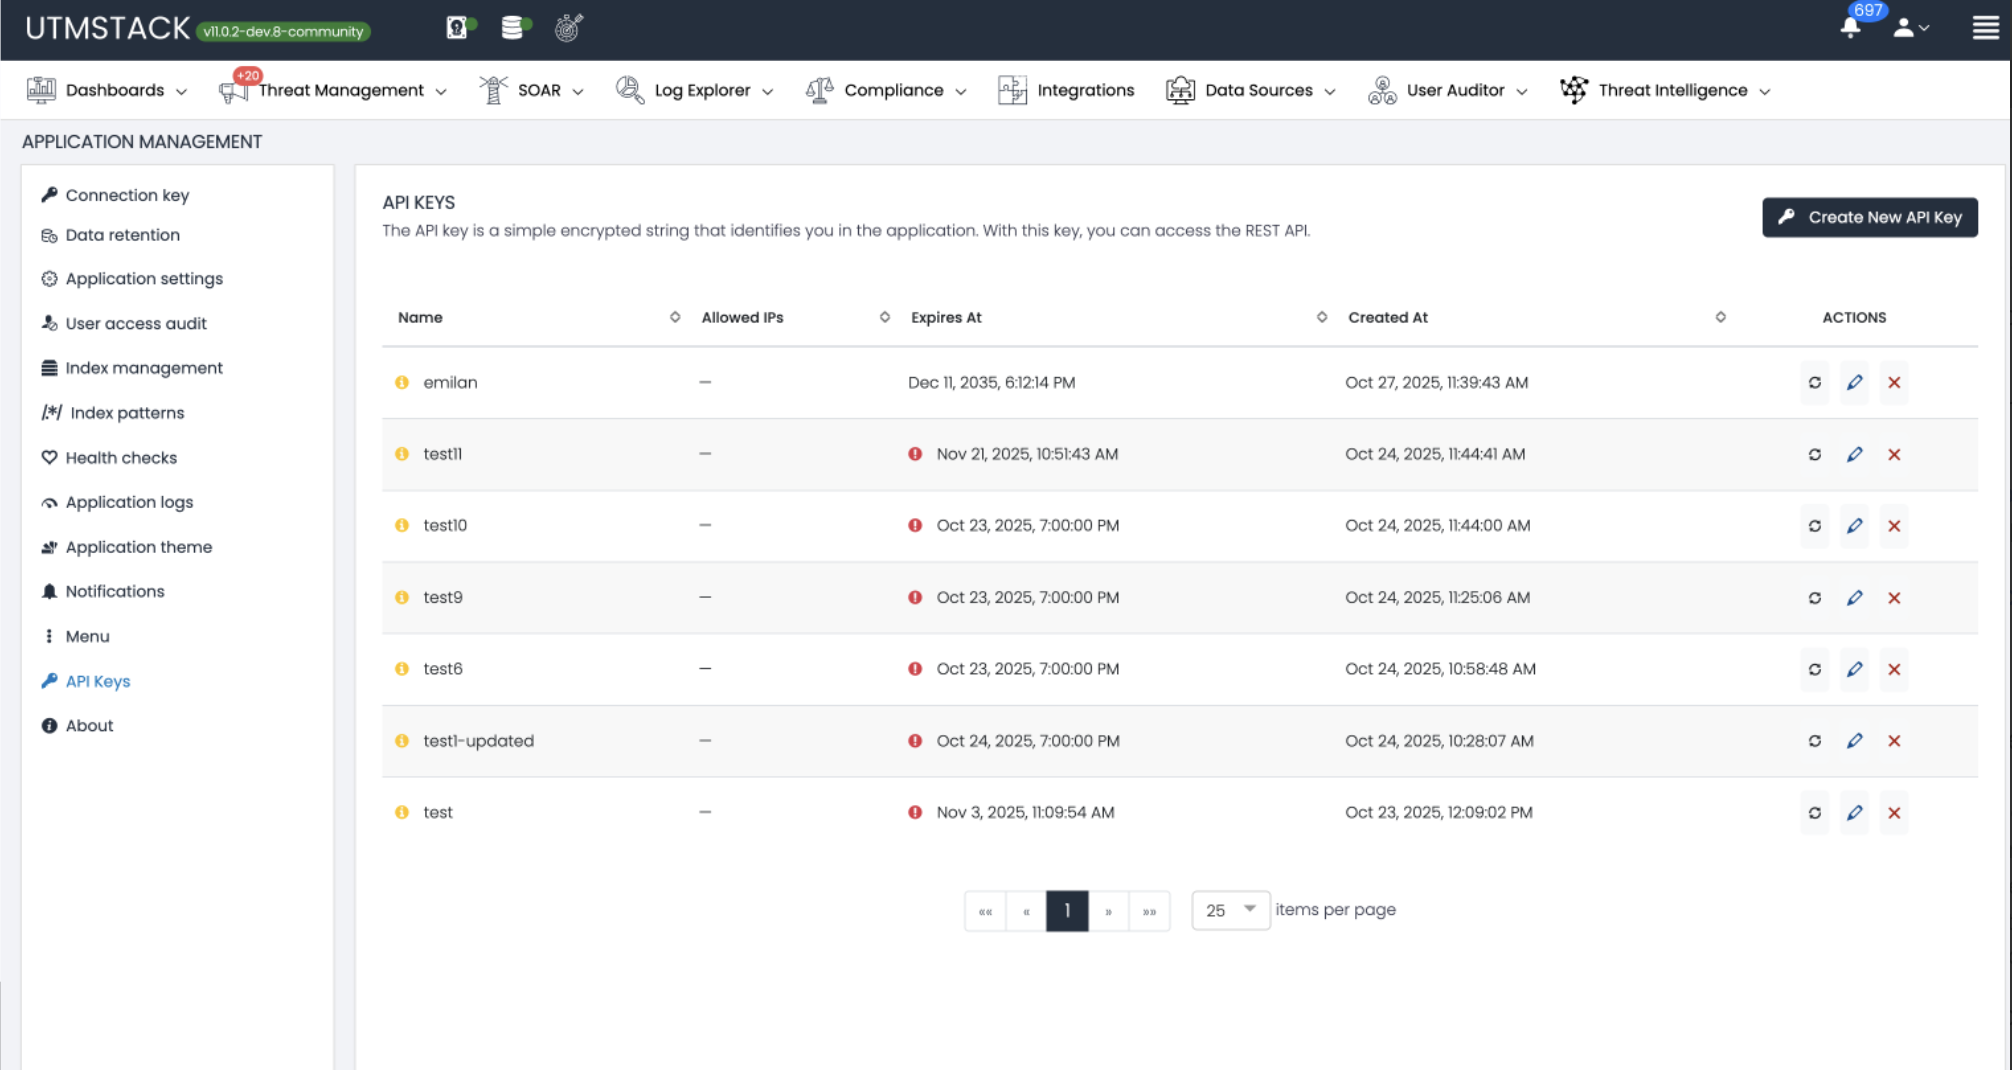 The API Keys page displays a table with:
* **Name**: Descriptive name of the API key
* **Created At**: Timestamp when the key was created
* **Expires At**: Expiration date and time
* **Status indicators**: Red icon for expired or problematic keys, green for active
* **Actions**: Icons to view details, regenerate, or delete each key
* **Pagination**: Navigate through multiple pages of API keys at the bottom
***
## Creating a New API Key
On the API Keys page, locate and click the **Create Api Key** button in the top right corner.
The button is positioned above the API keys table for easy access.
A modal dialog titled **"Create Api Key"** will appear with the following fields:
The API Keys page displays a table with:
* **Name**: Descriptive name of the API key
* **Created At**: Timestamp when the key was created
* **Expires At**: Expiration date and time
* **Status indicators**: Red icon for expired or problematic keys, green for active
* **Actions**: Icons to view details, regenerate, or delete each key
* **Pagination**: Navigate through multiple pages of API keys at the bottom
***
## Creating a New API Key
On the API Keys page, locate and click the **Create Api Key** button in the top right corner.
The button is positioned above the API keys table for easy access.
A modal dialog titled **"Create Api Key"** will appear with the following fields:
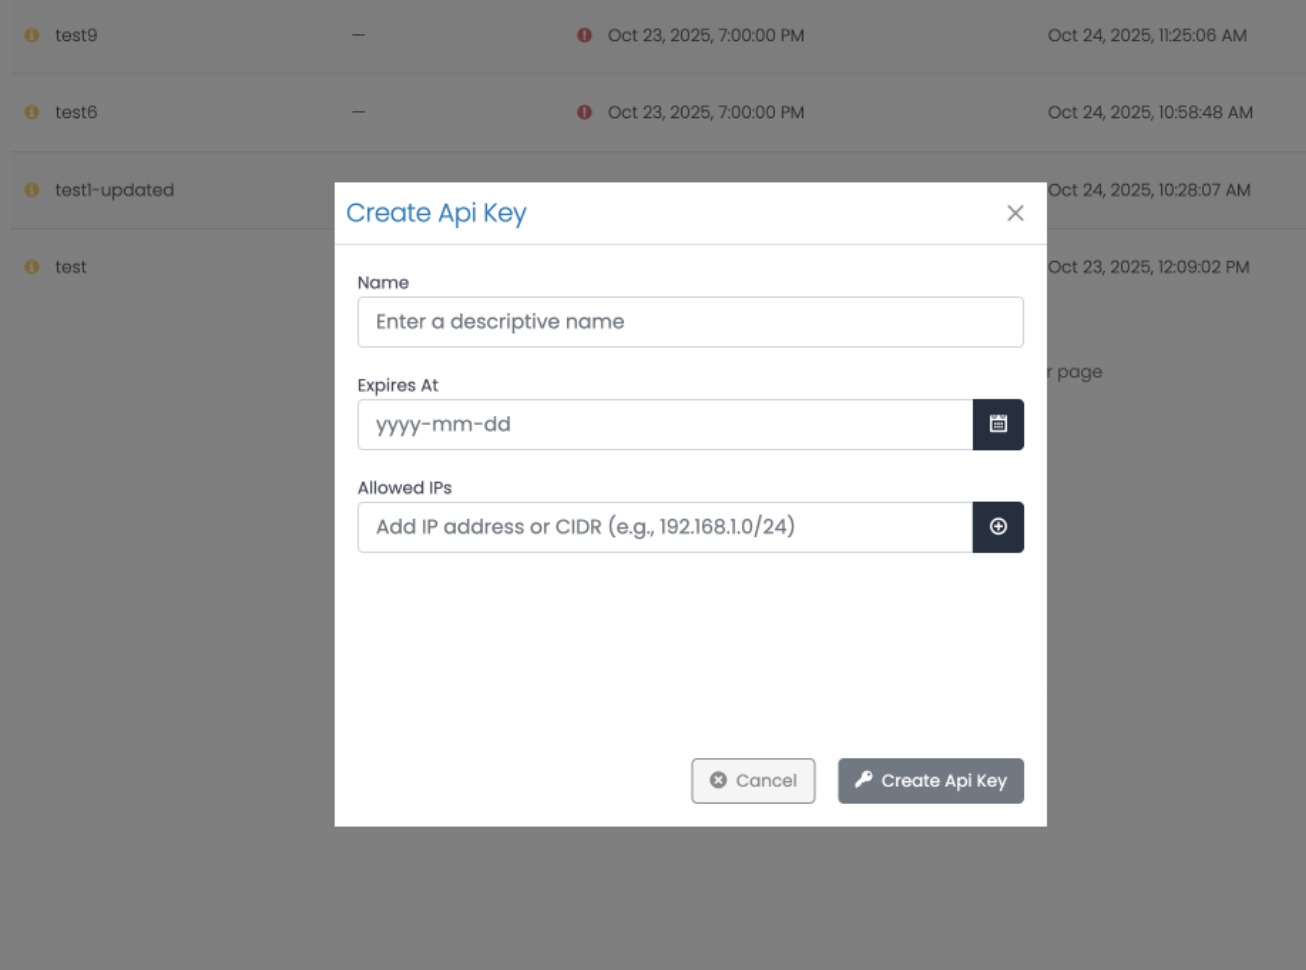 ### Name
Enter a descriptive name for your API key (e.g., "Integration Agent", "Monitoring Script", "Test").
Use clear, descriptive names that indicate the purpose and environment of the key.
Click the calendar icon next to **"Expires At"** to open the date picker.
Select a future date when the API key should expire (e.g., `2035-11-01`).
**Best Practices**:
* Set shorter expiration periods for testing or temporary integrations (30-90 days)
* Use longer periods (e.g., 1 year) for production integrations
* Regularly rotate API keys before expiration for enhanced security
Expired keys will be automatically disabled and cannot be used for authentication. You'll need to regenerate them.
In the **"Allowed IPs"** field, add IP addresses or CIDR ranges that are permitted to use this API key.
**Input Format**:
* Type or paste an IP address or CIDR notation
* Click the plus icon (⊕) to add it to the allowed list
* Example placeholder: `Add IP address or CIDR (e.g., 192.168.1.0/24)`
**Format Examples**:
* Single IP: `192.168.1.10`
* CIDR Range: `192.168.1.0/24`
* Multiple entries: Add each IP/CIDR separately by clicking the plus icon
**Security Recommendation**: Always restrict API keys to specific IP addresses or ranges. The form will show an error message "Please enter an IP address or CIDR" if you try to proceed without adding at least one IP.
Avoid leaving this field empty unless absolutely necessary for your use case.
Click the **Create API Key** button to generate the key.
After clicking **Create Api Key**, a success dialog titled **"Generated Api Key"** will appear displaying your newly created API key.
### Name
Enter a descriptive name for your API key (e.g., "Integration Agent", "Monitoring Script", "Test").
Use clear, descriptive names that indicate the purpose and environment of the key.
Click the calendar icon next to **"Expires At"** to open the date picker.
Select a future date when the API key should expire (e.g., `2035-11-01`).
**Best Practices**:
* Set shorter expiration periods for testing or temporary integrations (30-90 days)
* Use longer periods (e.g., 1 year) for production integrations
* Regularly rotate API keys before expiration for enhanced security
Expired keys will be automatically disabled and cannot be used for authentication. You'll need to regenerate them.
In the **"Allowed IPs"** field, add IP addresses or CIDR ranges that are permitted to use this API key.
**Input Format**:
* Type or paste an IP address or CIDR notation
* Click the plus icon (⊕) to add it to the allowed list
* Example placeholder: `Add IP address or CIDR (e.g., 192.168.1.0/24)`
**Format Examples**:
* Single IP: `192.168.1.10`
* CIDR Range: `192.168.1.0/24`
* Multiple entries: Add each IP/CIDR separately by clicking the plus icon
**Security Recommendation**: Always restrict API keys to specific IP addresses or ranges. The form will show an error message "Please enter an IP address or CIDR" if you try to proceed without adding at least one IP.
Avoid leaving this field empty unless absolutely necessary for your use case.
Click the **Create API Key** button to generate the key.
After clicking **Create Api Key**, a success dialog titled **"Generated Api Key"** will appear displaying your newly created API key.
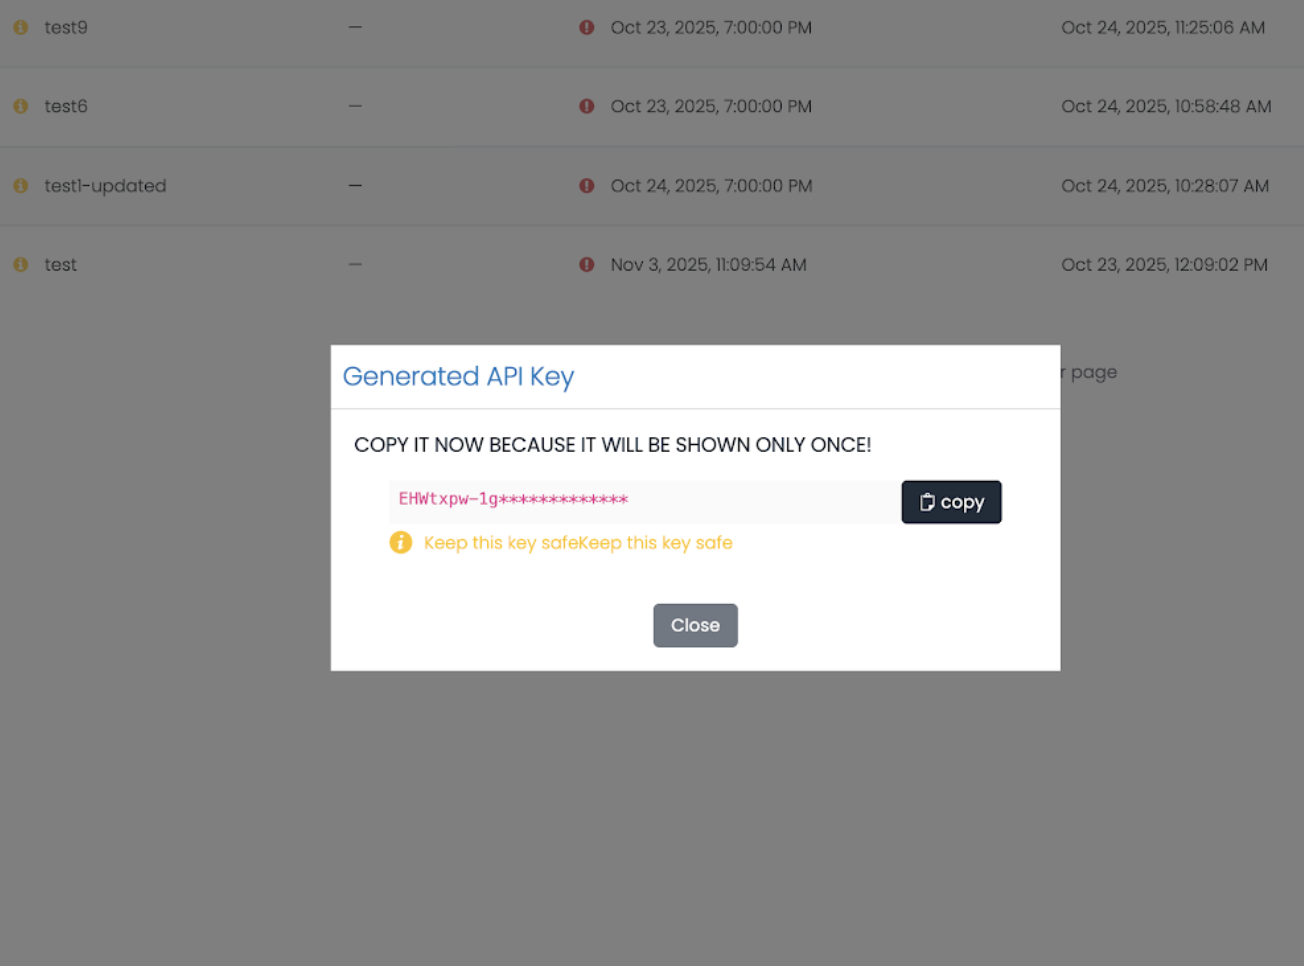 The dialog shows:
* A message: "COPY YOUR API KEY AS IT WILL BE SHOWN ONLY ONCE"
* The API key value (partially masked with dots: `••••••••`)
* A **Copy** button to copy the key to your clipboard
* A **Close** button
**CRITICAL - READ CAREFULLY**: This is the **only time** you will see the complete API key.
**Action Required**:
1. Click the **Copy** button immediately to copy the key to your clipboard
2. Paste and store it in a secure password manager or secrets vault
3. **You cannot retrieve this key again** - if lost, you must regenerate it
4. Only click **Close** after you have safely stored the key
Verify that you've successfully copied the key by pasting it into a secure location before closing the dialog.
***
## Managing Existing API Keys
### View API Key Details
Click on any API key in the list to view its details:
* Name
* Creation date
* Expiration date
* Allowed IP addresses
* Last used timestamp
### Regenerate an API Key
If an API key is compromised or needs to be rotated:
Find the API key you want to regenerate in the list.
Click the regenerate icon (circular arrows) next to the API key.
Confirm the action. The old key will be invalidated immediately.
Copy and securely store the newly generated key.
Regenerating an API key immediately invalidates the old key. Update all applications using the old key to prevent authentication failures.
***
### Delete an API Key
To permanently remove an API key:
Find the API key you want to delete in the list.
Click the delete icon (trash can) next to the API key.
Confirm the action. This cannot be undone.
Deleting an API key is permanent and cannot be undone. All applications using this key will immediately lose access.
***
## Security Best Practices
**Always** configure allowed IP addresses or CIDR ranges for each API key. This prevents unauthorized use if a key is compromised.
**Example**:
* Development: `192.168.1.0/24` (internal network only)
* Production: `203.0.113.10` (specific server IP)
* Cloud: Use your cloud provider's outbound IP ranges
Set appropriate expiration dates based on use case:
* **Testing/Development**: 30-90 days
* **Production**: 6-12 months
* **Temporary integrations**: As short as needed
Regularly rotate keys before expiration.
Never store API keys in:
* Source code repositories
* Configuration files committed to version control
* Plain text files on disk
* Browser local storage
**Secure storage options**:
* Environment variables
* Secret management services (HashiCorp Vault, AWS Secrets Manager)
* Encrypted configuration stores
* Password managers (for manual testing)
Name API keys clearly to indicate their purpose and owner:
* ✅ "Production-SIEM-Integration-Server-01"
* ✅ "Dev-Testing-John-Temp"
* ✅ "Monitoring-Script-Nagios"
* ❌ "Test"
* ❌ "Key1"
Regularly review:
* Active API keys and their purpose
* Last used timestamps
* Keys approaching expiration
* Unused or forgotten keys (delete them)
Set up alerts for:
* Failed authentication attempts
* Keys used from unexpected IP addresses
* Keys approaching expiration
Create separate API keys for different purposes:
* One key per application/integration
* One key per environment (dev, staging, production)
* Different keys for different teams
This limits the impact if a single key is compromised.
If you suspect a key has been compromised:
1. **Immediately regenerate or delete it**
2. Review access logs for suspicious activity
3. Update all legitimate applications with the new key
4. Investigate the potential security incident
***
## API Key Lifecycle Management
### Recommended Workflow
Define why you need the key and document its intended use.
* Set appropriate expiration date
* Add allowed IP restrictions
* Use descriptive name
Store the key in a secure location and share only with authorized personnel through secure channels.
Regularly check when the key was last used and from which IPs.
Create a new key and update applications before the old one expires.
After successfully transitioning to the new key, delete or let the old key expire.
***
For enterprise support with API integrations or custom development, contact the UTMStack support team at [support@utmstack.com](mailto:support@utmstack.com)
The dialog shows:
* A message: "COPY YOUR API KEY AS IT WILL BE SHOWN ONLY ONCE"
* The API key value (partially masked with dots: `••••••••`)
* A **Copy** button to copy the key to your clipboard
* A **Close** button
**CRITICAL - READ CAREFULLY**: This is the **only time** you will see the complete API key.
**Action Required**:
1. Click the **Copy** button immediately to copy the key to your clipboard
2. Paste and store it in a secure password manager or secrets vault
3. **You cannot retrieve this key again** - if lost, you must regenerate it
4. Only click **Close** after you have safely stored the key
Verify that you've successfully copied the key by pasting it into a secure location before closing the dialog.
***
## Managing Existing API Keys
### View API Key Details
Click on any API key in the list to view its details:
* Name
* Creation date
* Expiration date
* Allowed IP addresses
* Last used timestamp
### Regenerate an API Key
If an API key is compromised or needs to be rotated:
Find the API key you want to regenerate in the list.
Click the regenerate icon (circular arrows) next to the API key.
Confirm the action. The old key will be invalidated immediately.
Copy and securely store the newly generated key.
Regenerating an API key immediately invalidates the old key. Update all applications using the old key to prevent authentication failures.
***
### Delete an API Key
To permanently remove an API key:
Find the API key you want to delete in the list.
Click the delete icon (trash can) next to the API key.
Confirm the action. This cannot be undone.
Deleting an API key is permanent and cannot be undone. All applications using this key will immediately lose access.
***
## Security Best Practices
**Always** configure allowed IP addresses or CIDR ranges for each API key. This prevents unauthorized use if a key is compromised.
**Example**:
* Development: `192.168.1.0/24` (internal network only)
* Production: `203.0.113.10` (specific server IP)
* Cloud: Use your cloud provider's outbound IP ranges
Set appropriate expiration dates based on use case:
* **Testing/Development**: 30-90 days
* **Production**: 6-12 months
* **Temporary integrations**: As short as needed
Regularly rotate keys before expiration.
Never store API keys in:
* Source code repositories
* Configuration files committed to version control
* Plain text files on disk
* Browser local storage
**Secure storage options**:
* Environment variables
* Secret management services (HashiCorp Vault, AWS Secrets Manager)
* Encrypted configuration stores
* Password managers (for manual testing)
Name API keys clearly to indicate their purpose and owner:
* ✅ "Production-SIEM-Integration-Server-01"
* ✅ "Dev-Testing-John-Temp"
* ✅ "Monitoring-Script-Nagios"
* ❌ "Test"
* ❌ "Key1"
Regularly review:
* Active API keys and their purpose
* Last used timestamps
* Keys approaching expiration
* Unused or forgotten keys (delete them)
Set up alerts for:
* Failed authentication attempts
* Keys used from unexpected IP addresses
* Keys approaching expiration
Create separate API keys for different purposes:
* One key per application/integration
* One key per environment (dev, staging, production)
* Different keys for different teams
This limits the impact if a single key is compromised.
If you suspect a key has been compromised:
1. **Immediately regenerate or delete it**
2. Review access logs for suspicious activity
3. Update all legitimate applications with the new key
4. Investigate the potential security incident
***
## API Key Lifecycle Management
### Recommended Workflow
Define why you need the key and document its intended use.
* Set appropriate expiration date
* Add allowed IP restrictions
* Use descriptive name
Store the key in a secure location and share only with authorized personnel through secure channels.
Regularly check when the key was last used and from which IPs.
Create a new key and update applications before the old one expires.
After successfully transitioning to the new key, delete or let the old key expire.
***
For enterprise support with API integrations or custom development, contact the UTMStack support team at [support@utmstack.com](mailto:support@utmstack.com)